Review: Bundled Photoshop Actions and Lightroom Custom Presets and Brushes by Sleeklens
I recently was given an opportunity to try out and play with several bundled Photoshop Actions and Lightroom Preset kits offered by the company, Sleeklens. If you’re a photographer who is looking for a jumpstart on your creative image processing, feel like your photos need a new stylish look, or are interested in expanding the range of some of your post-processing skills, these bundles of actions or presets might be worth your consideration.
I’ve been using actions and presets for years processing my own images. But if you happen to be at a fairly novice level of post-processing your digital images, or if you just have a total comfort level manipulating sliders in Lightroom or Photoshop to achieve the look that you like for your images, you might not even be aware of, or are perhaps intimidated by the idea of actions or presets.
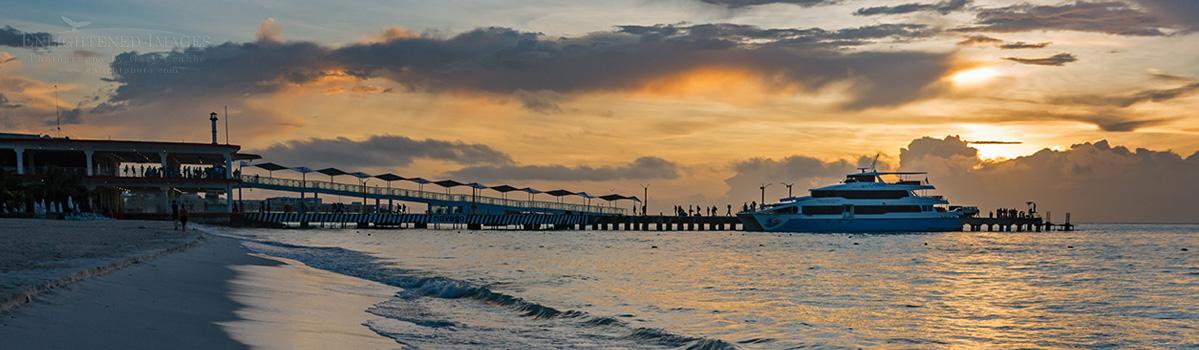
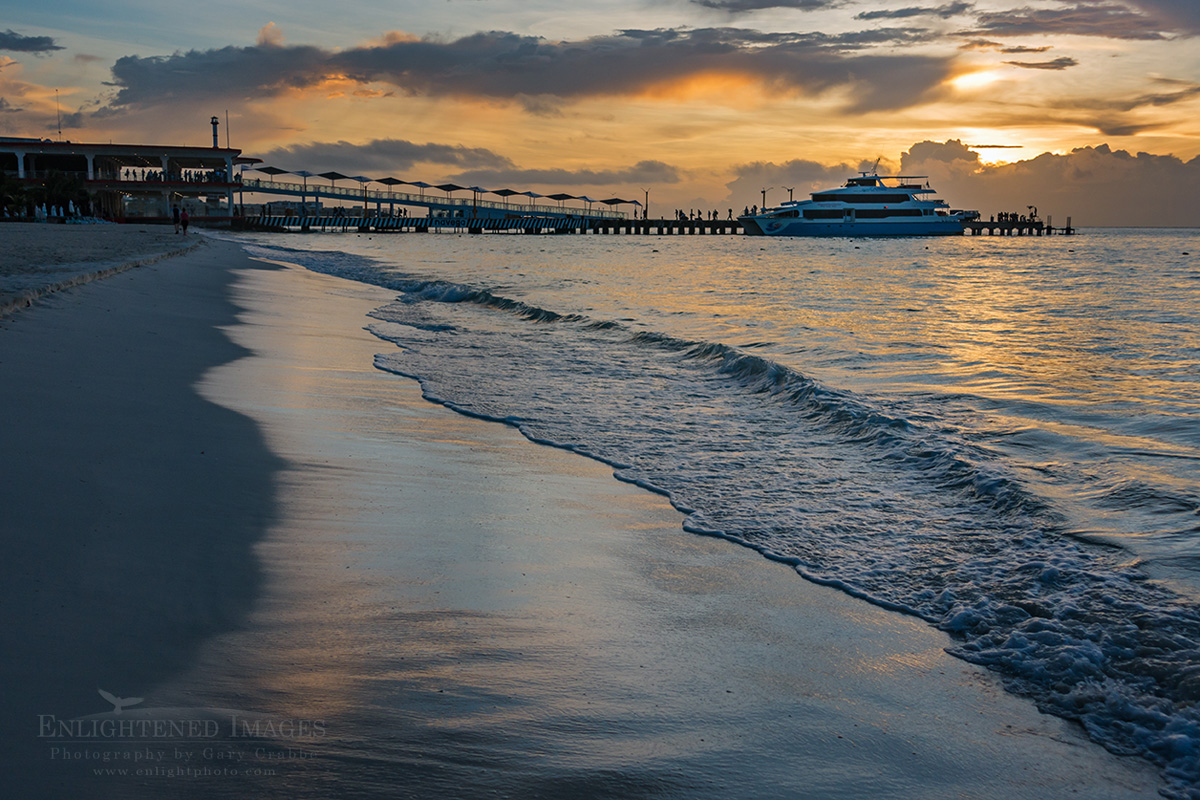
Pictured above: Beach and ferry at sunrise, Playa del Carmen, Quintana Roo, Mexico
In Photoshop, Actions are simply a recorded set of steps or commands in the same way other programs have what are called scripts. This can be thought of as “Do A, B, C, D, E, etc.” In Lightroom, Presets are simply a recording of settings that get applied with a single click. For example, “Set slider A to 1, slider B to 25, slider C to 75, etc.,” are all done at once with one click. In fact, all those wonderful and easy to use Instagram filters are just like presets you could use in Lightroom. Actions and presets are a big deal in the world of digital photography because of how easy they make achieving a given look, feel, or style. There are a number of companies out there who offer bundled packages of actions and presets, and Sleeklens is one of those companies.
The Sleeklens bundles that I got to play with were the Landscape Adventures Actions for Photoshop and the Through the Woods Presets and Brushes for Lightroom. The Landscapes & Adventures includes over 50 Photoshop Actions, and is compatible with Photoshop CS4-6 and Creative Cloud. The Through the Woods set contains more than 50 Presets, as well as 30 custom brushes that will allow you to apply certain effects to parts of an image, and works with LR 4, 5, 6, and Creative Cloud versions. Both bundles come as downloadable ZIP folders, are available for Apple and PC Platforms, and are capable of editing either JPEG or RAW files. Sleeklens provides clear and easy to understand instructions and videos for extracting and installing the Presets in Lightroom or the Actions into Photoshop.

I started my workflow of using these Presets, Actions, and Brushes with a couple RAW files that I shot recently using my Sony RX100-mIII 20Mp Point-n-Shoot camera. I processed each image independently as well as using either the Lightroom Presets or Photoshop Actions. In the Gallery below, you’ll see a variety of the images that resulted from using these Sleeklens Actions and Presets. The beach in Playa del Carmen (with the exception of the RAW and self-processed image) were done using the Landscape Adventures Photoshop Actions, and the Point Reyes Lighthouse were (again, with the exception of the RAW and self-processed image) processed using the Through the Woods Lightroom Presets and Brushes. I was happy to see that each set of actions or presets included options that were available for processing your images in Black and White, something that I’ve been playing with a little bit of more of on my own recently.
In the real world: Especially for beginners or those folks who are intimidated by advanced post-processing techniques, using the Lightroom Presets are far easier to use than the Photoshop Actions. The best thing about using the Presets in Lightroom is that with the Navigation Pane open in the Develop Module, you can instantly see what the image will look like before you actually apply the settings simply by hovering your cursor over the name of the preset. This preview aspect alone is an invaluable time saver for deciding what look or feel you want your image to take. You can also modify the look of any preset after the fact by simply adjusting the relevant sliders in the Develop module.
Using the Photoshop Actions is a bit trickier. There’s no way to preview the end result unless you run the action. You would think that this makes for a good bit of using the Undo command, but alas, with actions it’s not that simple. An Undo command will only undo the last step of the action. To completely reverse or undo an action, you should get in the habit of creating a snapshot in your History panel before running the action, since many advanced actions may have more steps than your history will contain. The other more advanced aspect of the Photoshop Actions is that they’re designed to work best by using multiple layers, where optimal processing is done through adjusting layer opacity or creating layer masks and using brushes to isolate areas where the action effect should be applied. However, if you’re interested in learning how to work with multiple layers, opacity, and masking, these actions provide a great foundation to get started, and Sleeklens does offer some training videos for each bundle to make the learning curve that much easier.
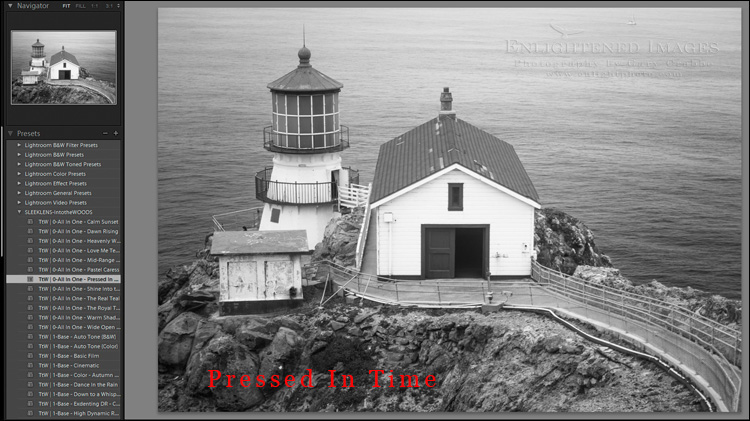
Using the Lightroom Presets, I will say that after spending about 8 minutes to self-process my image of the Point Reyes Lighthouse, I was able to click on about five or six presets in the Through the Woods Lightroom Preset bundle and achieve a very similar look and feel to my own processed image, but it took only a minute of processing time. That time saving and ease of use can be a huge benefit to those who struggle with spending lots of time post-processing images. In addition, once you achieve a look and feel that you like in Lightroom using one or more presets, you can then easily batch apply (sync) those same settings to a large number of images with a single click. This can be a huge advantage to someone who wants to apply an overall look or style to a given set of images from a certain shoot or location.
In general, I found that for both bundles, the breadth of the Actions or Presets aimed at achieving an ‘end’ result were a bit less varied than I would have imagined given the size of each set. Each set has a fair number of full-on stylistic actions or presets called the All-In-One(s) or Base options. But there are also a bunch of actions or presets made for making basic adjustments, for instance lighten, darken, add contrast, warm or cool highlights or shadows, etc.. I found that for some All-In-One or Base options, a number of those presets or action were quite similar to one another, with sometimes only very subtle visual differences in the overall effect.
I should also note that for the Action set in Photoshop, it has a number of effects and web presentation options that are not available in the Lightroom Preset bundle. On the other hand, it’s much easier to use the custom effect brushes in the Lightroom Presets than it is to brush in an effect using the Photoshop Actions and working with layer masks.
Now to be sure, in both Photoshop or Lightroom bundles, you’re not limited to using only one action or preset per image. In fact, part of being creative is playing with and using multiple presets or actions to achieve a desired end result. An All-In-One or Base Action or Preset could be thought of as a mid-point, not an end point. Other actions or presets could or should be used to achieve the final look and feel that you’re going for. In one of the Action-based images, I did multiple actions to get the main look and feel, then one more that added a bit of a flare effect. I was able to position that effect over the exact part of the image I wanted using the layer and move tool, and adjust the strength of the effect by controlling the layer’s opacity.
With the number of Presets or Actions contained within each bundle, the amount of stylistic experimentation that you could do is extensive. But for a more advanced user, the basic correction options may seem a bit more like filler for each bundle. However, and I understand that there may be many less-advanced users who might gravitate toward and prefer using the basic corrections presets and actions that are included as part of an easily adaptable method for their own workflow. That’s why workflow options are as personal and varied as the images and styles we photographers produce.


Overall, I liked what each set of these bundles contained; a good combination of basic and extensive actions or presets designed to create visually distinct styles. The installation instructions were clear and easy to follow, and the videos made in support of using the actions were very understandable and effective in communicating how to work with the presets, actions, layers, opacity, and masks. I would rather see these sets tailored to a more overall variation of visual style options, and perhaps leave the more basic correctional options made available for purchase as a separate “basic” set of presets or actions. Think of it like asking for all the appetizers to be left on a separate tray, and just give me the meat and potatoes main course. But one thing is for certain, if you do get either of these bundles, you may not wind up with the exact dish (image style), but you for sure won’t leave the table hungry, ‘cuz it’s a pretty packed buffet.
In the end, I still personally preferred the image I created in Photoshop using my own processing (top) techniques, but it was enjoyable to see the variations and effects that the actions were capable of creating. It definitely does take a bit more advanced understanding of post-processing techniques to really grasp exactly what and how each of the Photoshop Actions are being used to create a given look or effect. But seeing how the layers are created and how they effect the image can definitely help someone who wants to learn more about these advance techniques for themselves. On the other hand, using the Lightroom Presets were a real treat because of the instant feedback available through the navigator (preview) pane, and the ease of use which didn’t involve more complex manipulation of layers. Furthermore, I was able to combine various Lightroom presets to create visually pleasing images with minimal time or effort vs. always having to stop and adjust the layer or effect opacity using the Photoshop actions. In terms of ease of use, the Lightroom bundle of presets and custom brushes was the hands-down winner, and would be my first recommendation for photographers who are just starting to ramp up their post-processing learning curve.
If you’d like to check out either the Landscape Adventures Actions for Photoshop and the Through the Woods Presets and Brushes for Lightroom, feel free to click on the links. The prices are $49 and $39 respectively. Please note, while these bundles were provided to me free of charge for the purpose of this review, this review is 100% uncompensated, and the links provided herein are non-affiliate links. I don’t make a dime or any form of commission or compensation should you decide to purchase these or any other product from Sleeklens. It should also be noted that these opinions are mine, and mine alone. Your experience or opinion on using these products may vary based on your own personal preferences.
—
![]()
If you like this post , I would greatly appreciate it if you’d consider sharing this with your friends using one of the Social Media sharing buttons located at the top or bottom of this post. You can also sign up to receive free updates by email when future posts are made to this blog.
![]()
—
Gary Crabbe is an award-winning commercial and editorial outdoor travel photographer and author based out of the San Francisco Bay Area, California. He has seven published books on California to his credit, including “Photographing California; v1-North”, which won the prestigious 2013 IBPA Benjamin Franklin Gold Medal award as Best Regional title. His client and publication credits include the National Geographic Society, the New York Times, Forbes Magazine, TIME, The North Face, Subaru, L.L. Bean, Victoria’s Secret, Sunset Magazine, The Nature Conservancy, and many more. Gary is also a photography instructor and consultant, offering both public and private photo workshops. He also works occasionally a professional freelance Photo Editor.
![]()